By Roger Russell
These
pages are copyrighted
No portion of this site may be reproduced in whole or in part
without written permission of the author.
What is on this page?
These instructions are for replacing broken glass with
new glass or with Acrylic.
They also apply for reattaching glass that has become detached from the outer
gear ring.
![]()
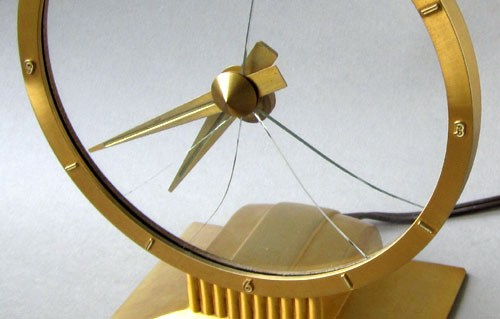
Acrylic (polyacrylate) is marketed under many trade names such as Lucite, Plexiglas, Perspex, Optix etc. Whether replacing broken glass or reattaching the old glass that has become detached, you might consider replacing the glass with a disc of clear, lightweight Lucite. An important advantage is that Lucite is shatter resistant. To my knowledge, although acrylics like Lucite and Plexiglas have been available for many years, they have never been used in Jefferson clocks except for the Suspense clock. I have replaced the glass from an early Golden Hour clock with Lucite of the same 3/32 inch thickness.
A Lucite disc weighs about half as much as glass. It reduces the total weight of moving parts by about 33%. Lighter weight means there is less friction force for the motor to overcome in rotating the assembly as it rests on the cast outer ring. It can certainly reduce motor wear as well. The base used to feel warm to the touch as it was running, indicating that the motor was working hard. About three years ago, I replaced the glass with Lucite. After making the change, the base has been cool to the touch.
Weight of the glass disc is 140 grams or about 4.9 ounces.
Weight of the Lucite disc is 74 grams or about 2.6 ounces.
Weight of the moving parts (gear ring, glass and hand subassembly) is 202 grams or about 7.1 ounces.
Weight of the moving parts (gear ring, Lucite and hand assembly) is 136 grams or about 4.8 ounces
The original Jefferson glass thickness is 3/32 inches or .094. inches.
The Lucite thickness I have used is .098 inches that is very close to the original glass thickness.
In comparison, some window glass thickness is 1/8 inch or .125 inches (3.2mm) and is too thick to easily mount the hand assembly or the retainer ring.
Lucite has a Truer Color Transmission
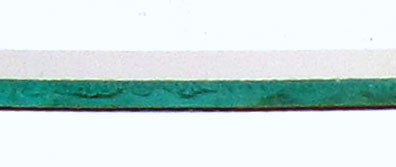
Clear Lucite and clear crystal are optically superior when it comes to color transmission. You have all heard the expression that things are “crystal clear.” To make a comparison, I have taken a picture of a glass disc removed from a Jefferson Golden Hour and a clear Lucite disc of the same diameter and thickness. I have shown the edges because it shows the difference better. The Lucite is placed on top of the glass and is hard to see against the white background. The edge of the Lucite is not polished after it was cut to size.
The glass has a very definite green color that is found in ordinary window glass. However, the Lucite has no color. Of course, this is not as apparent when looking directly through each of them. The green cast is due to the presence of iron and is found in common window glass but not found in Lucite or clear crystal. So the Golden Hour and perhaps the other Jefferson mystery clocks, except for the Plexiglas disc in the Suspense clock, were made with ordinary window glass and not “clear crystal” mentioned in the Jefferson literature.
Objects viewed through clear Lucite are more accurately seen and are a better match for the actual background behind the clock. This in turn enhances the effect of the hands floating in space. Lucite discs cost twice as much as glass but may be worth the change for some Golden Hour owners for longevity and peace of mind in case of accidents resulting in cracked or broken glass.
![]()
Replacement Golden Hour or Exciting Hour clear Lucite discs are now available for $25.00 each plus shipping.
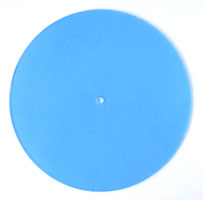
The Lucite disc comes with a blue protective coverings that can be peeled away from both sides when the disc is ready to be used. Although I have not installed a Lucite disc in the Jefferson Exciting Hour, it will likely fit as well.
Email
to
rogerr4@earthlink.net
![]()

There is no need to remove the hand assembly if you are simply reattaching the glass and you can proceed to later steps. However, if you are replacing the glass or switching to transparent plastic, the hand assembly must be removed. The cone nut can be unscrewed and then the minute hand can then be taken off. Following that, you can remove the convex tension washer, flat washer and fiber washer. The parts are shown from left to right in the order of removal. This comprises all of the parts located on the front of the glass. The hour hand assembly, including one fiber washer, can then be removed from the back of the glass.
![]()
I have found that removing the dial ring first makes is easier to replace the glass than with the base still attached.
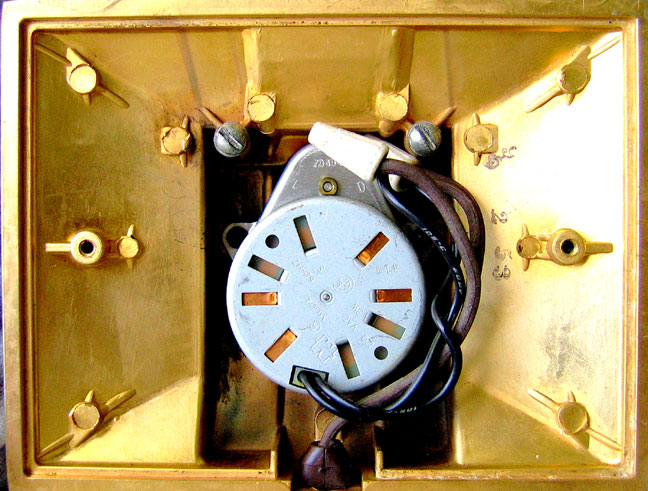
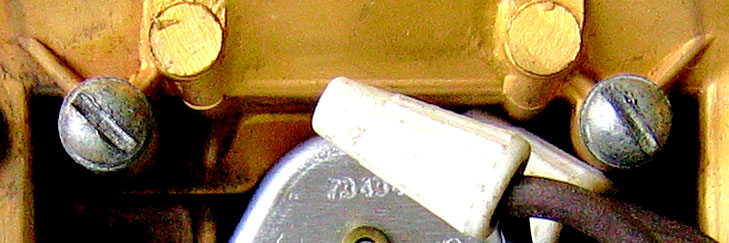
This is what the inside of the clock looks like when you remove the two screws holding the plastic bottom cover in place. The motor in this clock has been replaced recently. Two white wire nuts can be seen that make the connection between the brown line cord wires and the black motor wires.
Here are the two screws that hold the dial ring in place. When these are removed, the ring assembly is then free from the base.
![]()
The original Jefferson service drawing shows a screw driver being used to force the retainer ring towards the center of the gold dial ring. I think it is safer to remove the retainer ring but in a different way. These instructions are what I have used to replace the glass.
Lift the gold retaining ring with a small screw driver blade. There is a notch deliberately placed in the retaining ring so it can be lifted and rotated. In the picture, the notch in the ring has been lifted beyond the boss in the gold dial ring. The retaining ring can then be rotated to the next boss at the right and the ring can be lifted above this boss as well. At this point, the ring will come free from the two remaining bosses.
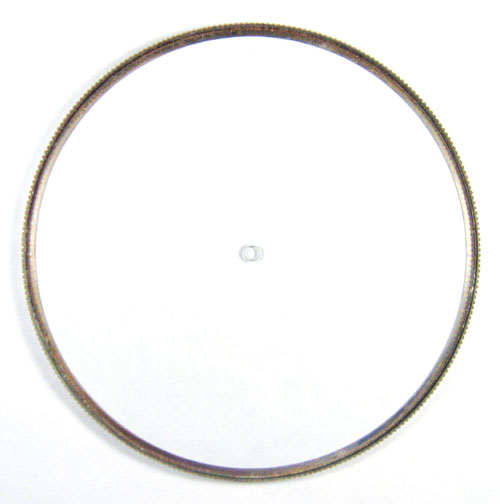
Gear Ring Subassembly with Glass
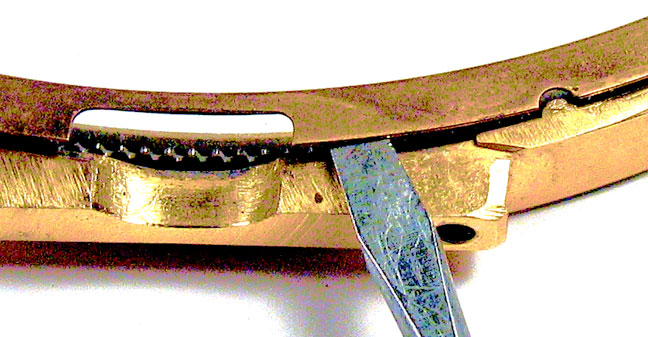
The glass disc may not be firmly glued to the gear ring everywhere and you may be able to push the glass free from the remaining areas. Otherwise, a knife blade can be inserted and the glass can be carefully pried away using a very small amount of pressure to avoid breaking the glass. Of course, if the glass is already broken, just be careful when removing the remaining pieces.

Leaf springs
When the gear ring subassembly is removed, you will see three small rectangular springs located in three depressions around the dial ring. Keep them in a safe place so that you don’t lose them. Note that the springs are mounted with the center bowed up and away from the dial ring. You may also find that there is an accumulation of dirt on the ring as well as the springs after years of operation. Of course, all of this should be cleaned up before reassembly.
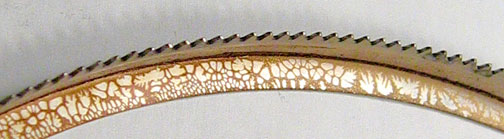
Gear Ring with Old Adhesive
The old cement should be cleaned from the inside of the gear ring before cementing the new disc in place. I have used acetone to soak on for a few minutes. Then the glue can be scraped off reasonably well followed by some Q-tips and acetone. If you are only reattaching the original glass, be sure to clean the glue from the glass as well.
![]()
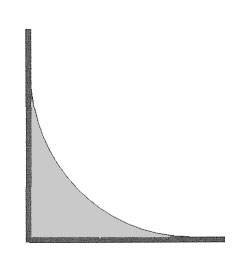 A new glass disc can be cemented with
various adhesives such as household cement. However, if a plastic disc is used
in place of glass, a neutral adhesive such as silicone RTV sealant can be used
that will not affect the Lucite. The RTV can be applied to the inside of the
gear ring as shown in the gray area in the drawing at the left. A little can be
applied by the finger and then run the finger around the ring to form this
cross section.. This will almost eliminate any adhesive from squeezing out when
the new disc is applied.
A new glass disc can be cemented with
various adhesives such as household cement. However, if a plastic disc is used
in place of glass, a neutral adhesive such as silicone RTV sealant can be used
that will not affect the Lucite. The RTV can be applied to the inside of the
gear ring as shown in the gray area in the drawing at the left. A little can be
applied by the finger and then run the finger around the ring to form this
cross section.. This will almost eliminate any adhesive from squeezing out when
the new disc is applied.
I have put the gear ring on some small blocks to keep it away from the surface under it. To ensure that the disc is firmly against the ring, I have put a weight near the center of the disc until the adhesive dries. This weight should be as much as half a pound.
The RTV smears easily so after pressing the disc into place, let the RTV set overnight and then any excess can be easily and completely wiped away with a tissue. Also, be sure to clear any RTV that might have spread into the gear ring teeth.
![]()
 With the dial ring face
down, the three leaf springs can then be put back in the three rectangular
depressions. The gear ring/disc assembly can then be put in place and the
retainer ring put back similar to the way it was removed. Remember to rotate the retainer ring back to where it
was and to lift it above the last boss to get it in the final position.
With the dial ring face
down, the three leaf springs can then be put back in the three rectangular
depressions. The gear ring/disc assembly can then be put in place and the
retainer ring put back similar to the way it was removed. Remember to rotate the retainer ring back to where it
was and to lift it above the last boss to get it in the final position.
The dial ring subassembly can then be mounted back on the base. There should be a small amount of play when rotating the disc. This verifies that the motor gear and gear ring are meshed properly. Install the base plate with the two screws previously removed.
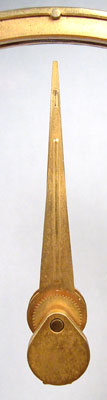
The hour hand/counterbalance assembly can then be installed from the rear through the hole in the disc. The tear drop counterweight should be aligned as shown with the hour hand pointing at 12 o’clock. The minute hand parts can then be attached to the front of the disc with the minute hand also pointing at 12 o’clock. The cone nut only needs to be finger tight so the hour hand can still be turned with a slight resistance. The hour hand/counterweight assembly must swing freely.
To set the time, rotate the counterweight one complete revolution for each hour. The minute hand can be moved clockwise to set the correct minutes. There will be a slight resistance to movement and this is normal.
The best cleaner for the glass disc and more importantly for the Lucite disc is an eyeglass lens cleaning pad that comes in a sealed envelope. It is commonly available and does a great job.
|
About This Site |
||
|
|
More text and pictures about Jefferson will be added as my research continues. Any comments, corrections, or additions are welcome. |
|
|
|
|
All
contents are copyrighted |